Wednesday, April 3, 2019

New Website has Arrived

To view my new website that I'll post all future photography on, visit:


The website is updated with better galleries, blogs and details on how to order my photography. 
Plus a contact page.


Thanks for visiting this page in the past and I look forward to you visiting the new website.

Wednesday, November 14, 2018

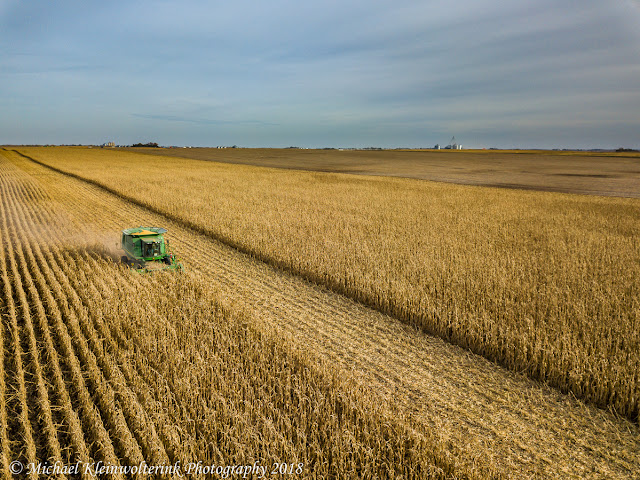
Harvest 18 from the Sky

Equipment Used: DJI Mavic Pro, Apple iPad, Samsung Galaxy S7 Edge, Lightroom & Photoshop CC

After renting a drone this summer, I ended up purchasing one this fall and decided to go with a used DJI Mavic Pro with the future plans of upgrading to a Mavic Pro 2 in a couple years. The aerial perspective of the landscape is exciting to capture and I took the opportunity during this fall’s harvest to capture our combine rolling through the fields.

I used a Galaxy S7 Edge or Apple iPad to control the drone with automatic exposure for the camera settings. I shot in RAW to be able to use Lightroom and Photoshop on the drones files. Getting the drone into position was a learning curve since the combine was always moving so I had to predict the composure of the scene while both the combine and drone were moving. I tried to stay  out in front of the combine, compose the scene and wait to click the shutter button on the controller when I liked the look of the image on the screen.

To edit the drones RAW files, I used Lightroom and created a preset of adjustments to increase the contrast, saturation and vibrancy of the corn field, sky and farm equipment. Sharpening and noise reduction were applied as well. In Photoshop, I straightened and cropped these images to finish them. I did two black and white edits on certain parts of the two images as well using layer masks and brush tools.

Not crashing the drone into the combine or getting it ran over was a success while being out in the field buzzing around with the Mavic Pro.  Looking forward to more photography with the drone.  

#1.

#2.

#3.

#4.

#5.

#6.

#7.

#8.

#9

#10.

#11.

#12.

#13.

#14.

#15.

#16.

#17.

#18.

#19.

Monday, October 15, 2018

Starry Night Sky in Early Fall

Equipment Used: Nikon D750, Tamron 24-70 mm f2.8 G2 lense, Nikon SB-700 Speedlights, Vello Flash triggers Vanguard Abel Plus 363CT tripod, Lightroom & Photoshop CC

The next night after capturing the golf course images at night, the sky was clear again and stars bright so I headed to the Templeton barn and corn crib to capture the Milky Way one last time. A few weeks later, I was watching Seal Team when I got a text from two buddies saying you need to check out the sky. It was lightening in the east but yet the sky was mostly clear so I headed out again to capture the scene.

The workhorse D750 and the 24-70mm was put on the Vanguard tripod and I framed the image via liveview and shining my headlamp onto the crib and barn. An aperture of f2.8, RAW and ISO ranging from 1000 to 6400 were used. In general, I’ll use the 1000 ISO to expose the buildings and 3200 to 6400 for the sky. The SB-700 Speedlights on their stands were placed into the ground and while the camera was exposing between 8 to 12 seconds, I hit the flash trigger to throw quick bursts of light onto the buildings. The new ball head that I put on the tripod allowed me to rotate the camera to create images to later blend them into panoramic.

I processed the sky and buildings using different presets and radial filters in Lightroom. I like the ease of use of the radial filter over the graduated filter for local adjustments and can put multiple radial filters on top of each other with different adjustments. I created 3 panoramic images using LR by combining around 5 images into one.

To finalize the images, Photoshop was used to get rid of unwanted objects using the healing and clone brush tools. Airplane lights and cell phone tower lights were removed using these tools. Using layer masks, I combined images of the buildings that were taken with a lower ISO with the sky. The custom brush of the windmill head was then “stamped” on top of the windmill since it is no longer there in its current state.  

The last five images were a unique scene with what Mother Nature created that night with the combination of lightening and clear skies.  Thanks to my buddies for letting me know about the scene. 

#1.

#2.

#3.

#4.

#5.

#6.

#7.

#8.

#9.

#10.

#11.

#12.

Saturday, October 13, 2018

Milky Way Astro over Lake Panorama National GC #15

Equipment Used: Nikon D750, Tamron 24-70 mm f2.8 G2 lense, Nikon SB-700 Speedlights, Vello Flash triggers Vanguard Abel Plus 363CT tripod, Lightroom & Photoshop CC
The new moon in September wraps up the season to capture the Milky Way so when the sky was clear one night, I headed to Lake Panorama National GC and walked out to hole #15.

I set up the D750 with the 24-70mm lense on it with the Vanguard tripod near the cart path facing the green and pond. I positioned the SB-700 speedlights on poles near the pond to expose the pond and green via triggering them with the VelloFlash receiver. ISO 3200 or 6400, Aperture of f2.8, RAW and 8-12 second exposure were the settings along with using the self timer set at 2 seconds. I took images to expose the sky and then the green/pond and later combined them in post. Images to make panoramic also were taken.

Lightroom presets were used to edit these images using my milky way II and golf course I preset. The milky preset brings out the detail and exposure of the milky way and stores while the golf course preset gives the grass a nice green color. I used the radial filter to brighten up the green area of the image as well. To create the panoramic image, I combined the multiple images in LR.

In Photoshop, the healing and clone brush were used to get rid of unwanted objects such water hazard stakes. I took the different sky and hole images and combined them using layer masks and the paint brush to blend them together to create one image.


With hole #15 looking great underneath the stars, my next project will hopefully be fall colors on LPN. 

#1.

#2.

#3.

Tuesday, August 28, 2018

Summer Sunflowers in 2018

Equipment Used: Nikon D750, Tamron 24-70 mm f2.8 G2 lense, Tamron 70-200 mm f2.8 G2 lense, Nikon SB-700 Speedlight, Zeikos Macro Extension Tube, Vanguard Abel Plus 363CT tripod, Viltrox Remote Control, Lightroom & Photoshop CC

Back in July, I traveled to the local sunflower plot with my camera on two different afternoons to capture the scene. Like I always seem to do when deciding to get pictures of them, the majority of the sunflowers were past their prime so I walked around to find a few that I liked.

I used the D750 with the two Tamron lenses on the Vanguard tripod and composed the sunflower to take up the majority of the frame. I zoomed in on live view to focus and then switched autofocus and VR off. ISO was set at 100 while aperture was set at f9, f16 or f22.  The self timer on the camera body was used so I could trigger and hold my SB-700 on the sunflower. Since I was using a flash, I did consistently have the EV set in negative values. I took one sunflower home to get some macro images and I used the Zeiko extension tubes to get a real close image.

A sunflower preset was created in Lightroom for this set of images and then I fine tuned each image off of that preset. Adjustments included slider adjustments under the presence, saturation, and detail tabs. Radial exposure filters were used to either darken or brighten the sunflower head or other parts of the image.

Since I was shooting fairly close up to these sunflowers, I had to clone out imperfections in the pedals of the sunflowers from bugs and wear and tear from being out in nature. Using the healing brush, content aware patch tool and clone tool, I was able to do this pretty good.  I added some vibrancy to the sunflower heads or sunset by using the vibrance layer as well. To create the black and white images, I used the black & white adjustment layer in PS and then brushed out the pedals to allow the yellow to show though.


New for this write up are a few images of my camera equipment while shooting the sunflowers to show how I captured the close up images of the them. 

#1.

#2.

#3.

#4.

#5.

#6.

#7.

#8.

#9.

#10.

#11.

#12.

#13.

#14.

#15.

#16.

A few shots of my equipment set up when taking the above images: